
How to set up domain email in Microsoft 365
On this page
Here’s a detailed Guide to Connecting your Custom Domain to Microsoft 365.
- Step 1 – Purchase a Microsoft 365 License
- Step 2 – How To Add Domain in Microsoft 365 Admin Centre
- Step 3 – Add Microsoft 365 DNS records
- Step 4 – Add DMARC and DKIM for Email Authentication & Security (Optional But recommended)
- Step 5 – Create User Account on Microsoft 365
- Step 6 – Microsoft 365 Email Login
- Step 7 – Set Up 2 Factor Authentication
- Step 8 – Test Incoming Email, Test Outgoing Email
Purchase a Microsoft 365 License
How to purchase a Microsoft 365 License
- Go to the Microsoft 365 business plans page and pick a plan that includes email (see the plans below).
- Select Buy now, or Try for free for a one-month trial.
- Enter your work email and business details, then choose your account name. This creates your free yourcompany.onmicrosoft.com address and your Microsoft 365 admin login.
- Choose how many licenses you need (one per person with a mailbox) and add your payment details.
Office 365 custom domain email price
The Office 365 custom domain email price depends on the plan you choose and whether it includes Microsoft Teams. Every plan below includes custom business email on your own domain (you@yourbusiness.com).
Office 365 Custom Domain Email Price in the US (USD)
| Plan | With Microsoft Teams | Without Microsoft Teams |
|---|---|---|
| Microsoft 365 Business Basic | $7.00 | $5.40 |
| Microsoft 365 Business Standard | $14.00 | $10.79 |
| Microsoft 365 Business Premium | $22.00 | $18.79 |
Source: Microsoft US pricing for Microsoft 365 plans with Microsoft Teams and Microsoft 365 plans without Microsoft Teams.
Office 365 Custom Domain Email Price in the UK (GBP)
| Plan | With Microsoft Teams | Without Microsoft Teams |
|---|---|---|
| Microsoft 365 Business Basic | £5.40 | £4.20 |
| Microsoft 365 Business Standard | £10.80 | £8.30 |
| Microsoft 365 Business Premium | £16.90 | £14.40 |
Source: Microsoft UK pricing for Microsoft 365 plans with Microsoft Teams and Microsoft 365 plans without Microsoft Teams.
Prices are per user per month on an annual subscription, exclude sales tax or VAT and are correct as of October 2026. Paying month to month costs more than the annual price. Prices in other countries are listed on Microsoft’s local pricing page.
Microsoft 365 Plans That Include Domain Email
- Exchange Online (Plan 1): email and calendar only.
- Microsoft 365 Business Basic: email plus web and mobile Word, Excel and PowerPoint, and 1 TB of OneDrive storage.
- Microsoft 365 Business Standard: everything in Basic plus the desktop apps.
- Microsoft 365 Business Premium: everything in Standard plus advanced security and device management.
Microsoft 365 Apps for business does not include business email.
How To Add Domain in Microsoft 365 Admin Centre
This guide applies when you want to add the domain to your Microsoft 365 account tenant. If you’re looking to add domain to Microsoft 365 Family, Microsoft stopped new personalized email addresses on its Family and Personal plans on 30 November 2023. Existing addresses still work, but to use your own domain today you need a Microsoft 365 business plan, such as Business Basic.
Add the Domain to a Microsoft 365 Account Tenant
Adding your domain to your Microsoft 365 account (Microsoft calls this your tenant) tells Microsoft which email addresses it will handle, such as you@yourbusiness.com. You need an admin login for the Microsoft 365 admin center.
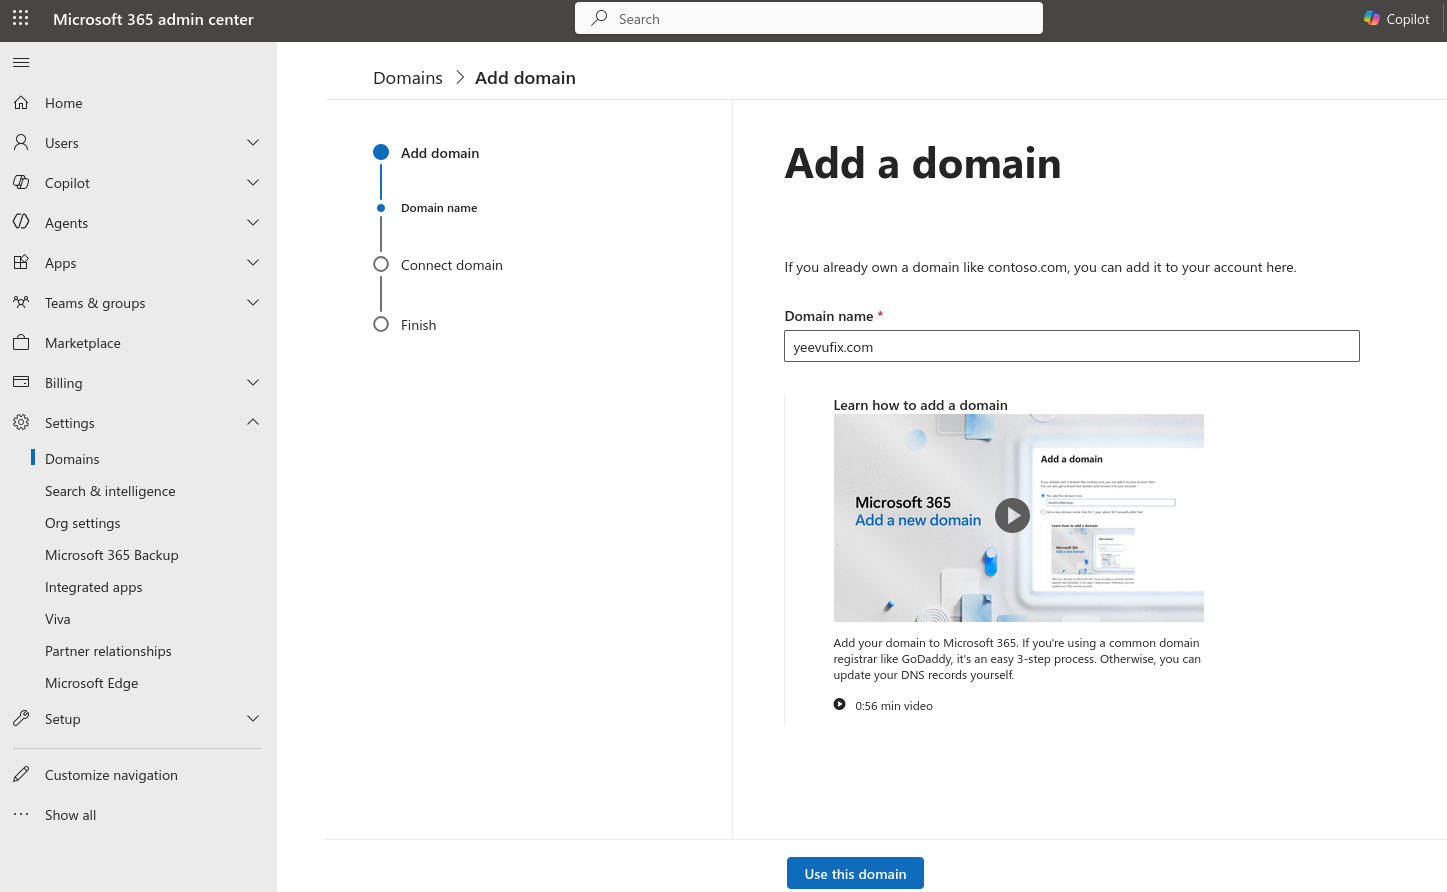
- Sign in to the Microsoft 365 admin center at admin.microsoft.com and go to Settings > Domains.
- Select Add domain, type your domain name (for example, yourbusiness.com) and select Use this domain.
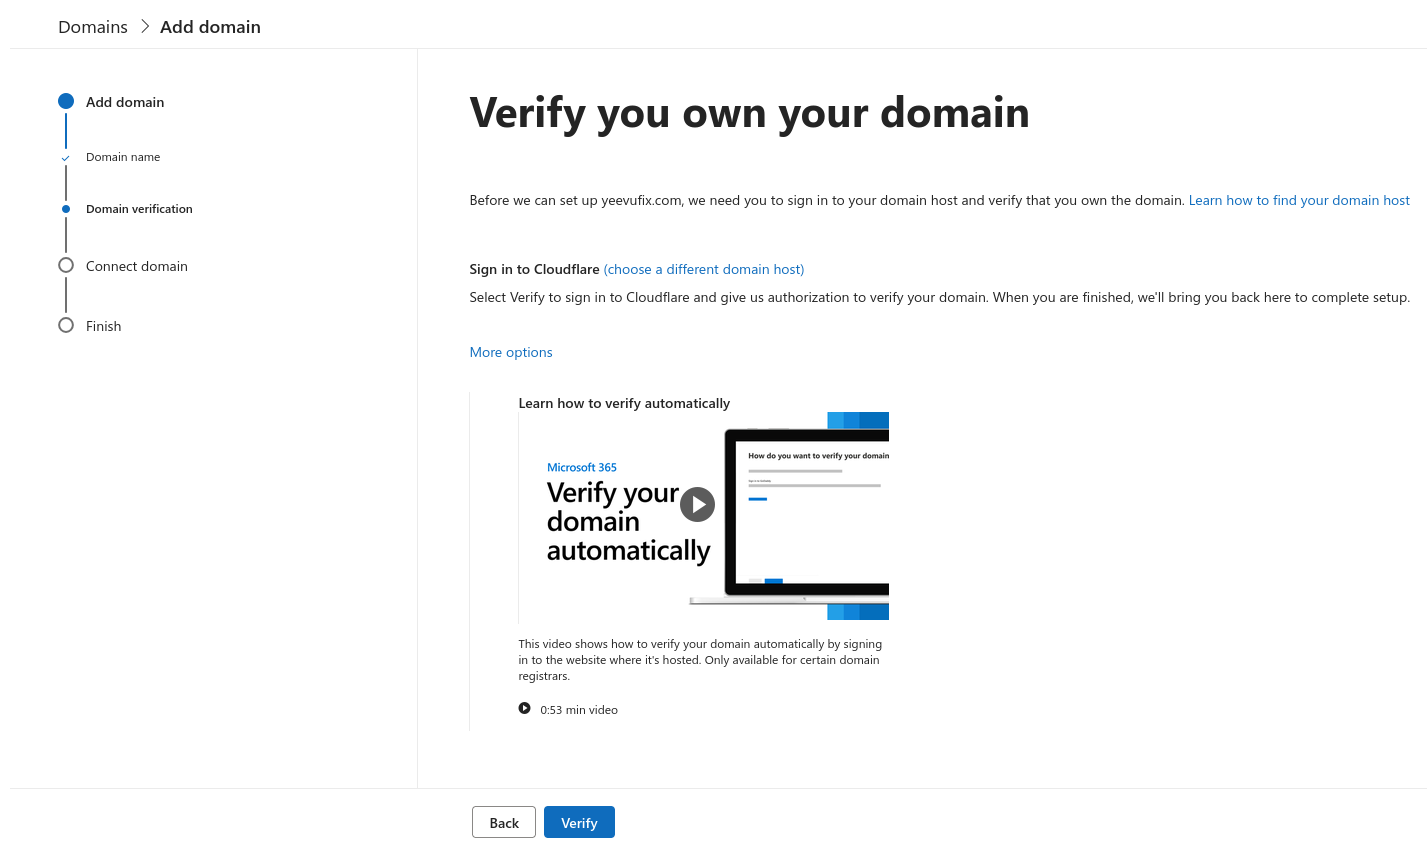
- On the Verify you own your domain screen, Microsoft detects your DNS provider. If the provider supports automatic setup, select Verify and sign in to it to verify automatically. To add the record yourself, select More options and follow the next section.
Add Microsoft 365 DNS Records
DNS records tell the internet how to handle your domain. Microsoft 365 needs a TXT record to prove you own the domain, then MX, SPF and autodiscover records to run your email. You add them at your DNS provider, which is often the company you registered the domain with. The screenshots in this guide use Cloudflare, but the records are the same at any DNS provider; only the menu and field names differ.
As of February 1 2024, Major email providers like Google (Gmail) and Yahoo officially mandated SPF (or DKIM) authentication, following Microsoft mandating this in 2007.
Validate Domain Ownership With the Microsoft 365 TXT Record
What is a TXT Record
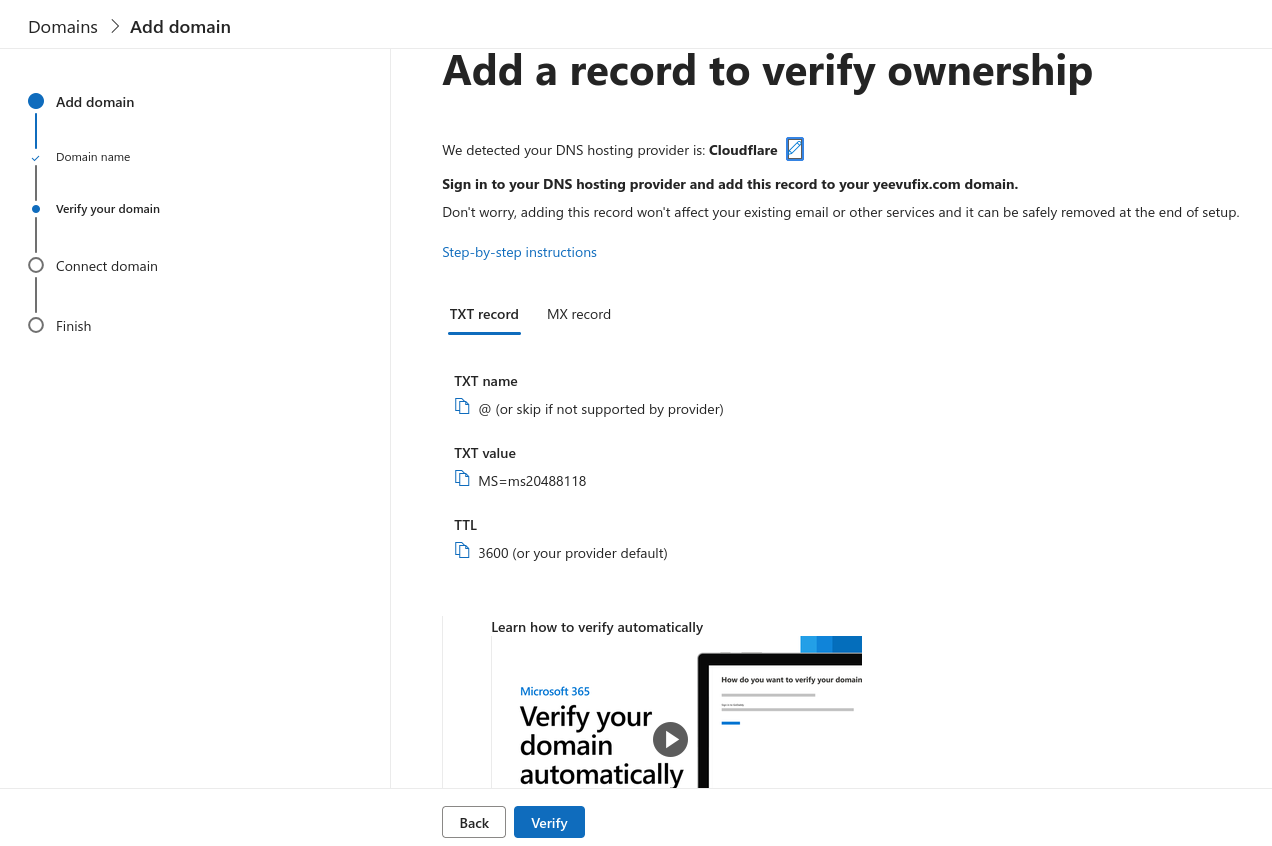
A TXT record is a short line of text stored in your domain’s DNS settings. Microsoft gives you a unique one, and when it appears on your domain, Microsoft knows you control it. Adding it doesn’t affect your existing email or website.
- Microsoft shows the record to add: TXT name @, a TXT value that starts with MS=ms followed by a number, and a TTL of 3600 (or your provider’s default).
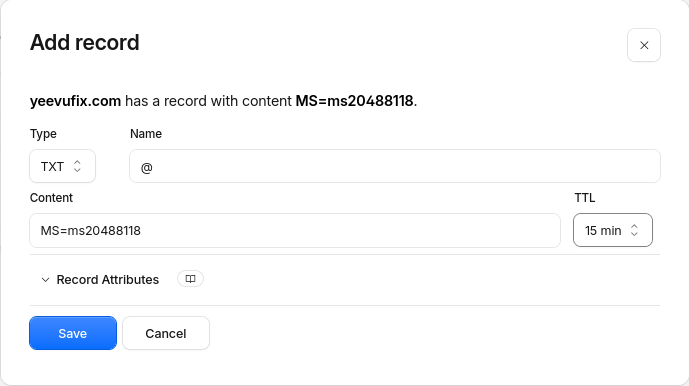
- Sign in to your DNS provider, open the DNS settings for your domain and add a new record.
- Set the type to TXT and the name (sometimes called host) to @, which means the domain itself. Paste the MS= value into the value field (sometimes called content) and save.
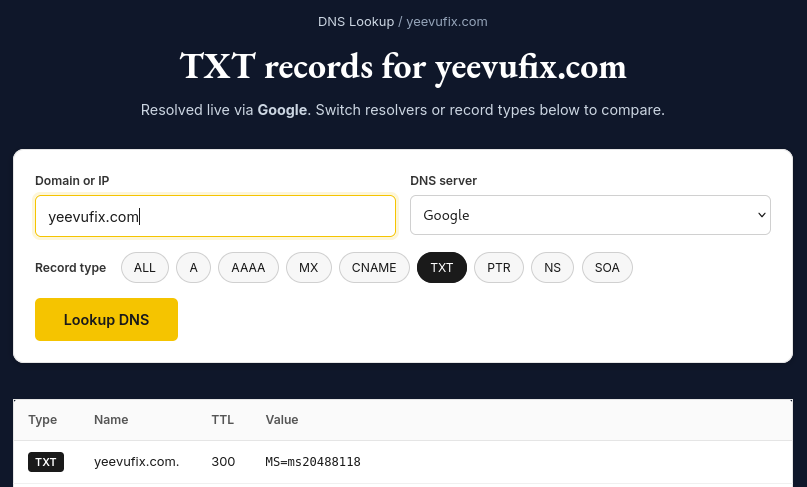
- Check the record is live with a DNS lookup tool: look up your domain’s TXT records and find the MS= value, as in this TXT record lookup.
- Back in Microsoft 365, select Verify. Once the domain is verified, you can delete this TXT record.
Testing the Microsoft 365 TXT Record Was Added
You can test each record using https://app.yeevu.com/dns/lookup/, particularly useful if Microsoft is unable to detect your change and you need a second opinion to verify.
Microsoft 365 MX Record for Domain Email
The MX record tells the rest of the internet where to deliver email for your domain. Pointing it at Microsoft 365 is the change that moves your incoming mail.
Before you change it: if you already receive email on this domain, create the Microsoft 365 mailboxes first (see Create User Account on Microsoft 365). Microsoft warns that anyone without a mailbox will stop receiving email once the MX record changes.
- After verification, select Continue, choose to add the DNS records yourself, and keep Exchange and Exchange Online Protection selected.
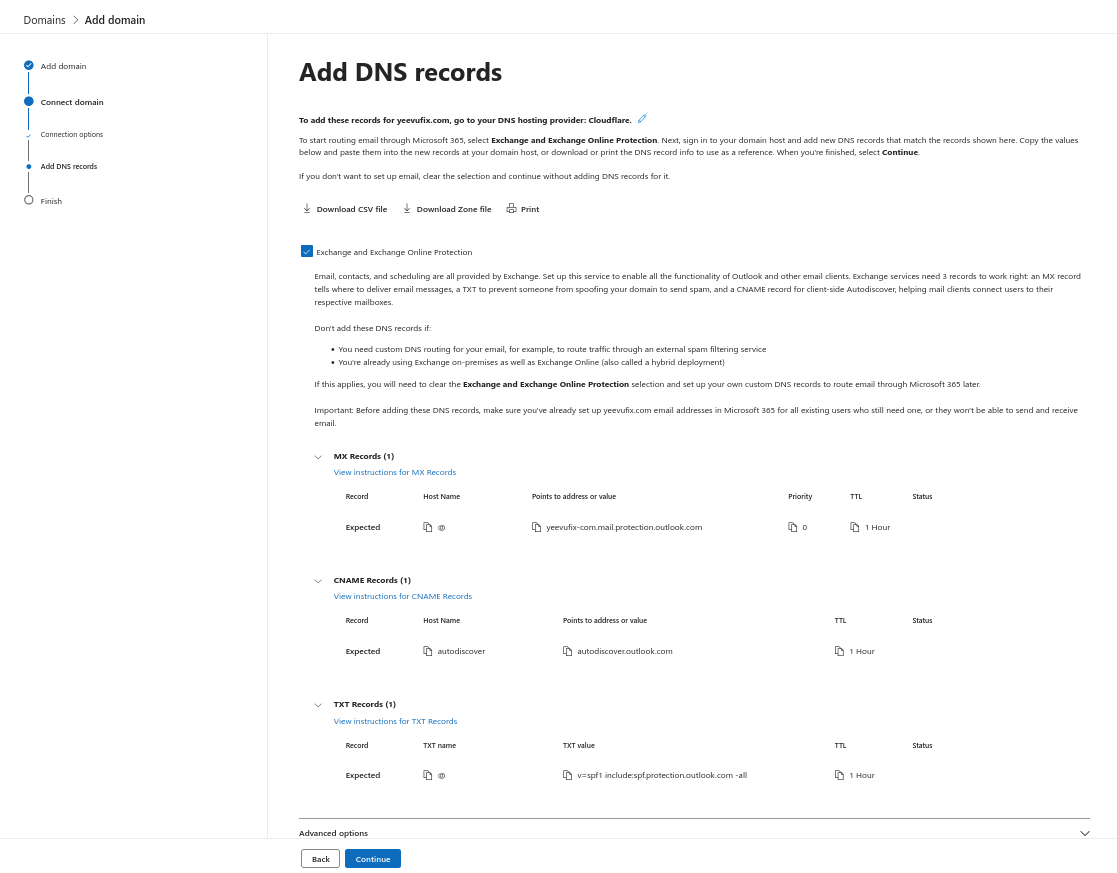
- Microsoft lists three records: an MX record, a CNAME record for autodiscover and a TXT record for SPF.
- Add the MX record at your DNS provider: name @, the mail server value Microsoft shows (your domain with dashes instead of dots, ending in .mail.protection.outlook.com) and priority 0.
- Delete any old MX records, so all incoming mail goes to Microsoft 365.
Microsoft 365 SPF Record
SPF (Sender Policy Framework) is a TXT record that lists the services allowed to send email from your domain. Without it, email sent through Microsoft 365 is more likely to land in spam.
Microsoft’s SPF value is:
v=spf1 include:spf.protection.outlook.com -allA domain can only have one SPF record, so check for an existing one first.
No SPF record yet: add a TXT record with name @ and Microsoft’s value above.
Already have one (it starts with v=spf1): don’t add a second. Edit it and add include:spf.protection.outlook.com before the -all or ~all at the end. In this guide’s example, yeevufix.com already had an SPF record for its existing email providers:
v=spf1 include:mxroute.com include:_spf.hostedemail.com -allWith Microsoft 365 added, it becomes:
v=spf1 include:mxroute.com include:_spf.hostedemail.com include:spf.protection.outlook.com -allOnce all your email runs through Microsoft 365, remove the includes for services you no longer use.
Microsoft 365 Autodiscover CNAME Record
The autodiscover record lets Outlook and phone mail apps find the Microsoft 365 mailbox from just an email address and password, so nobody has to type in server settings.
- Add a CNAME record at your DNS provider: name autodiscover, pointing to autodiscover.outlook.com.
- If your DNS provider offers a proxy setting for records, turn it off for this record.
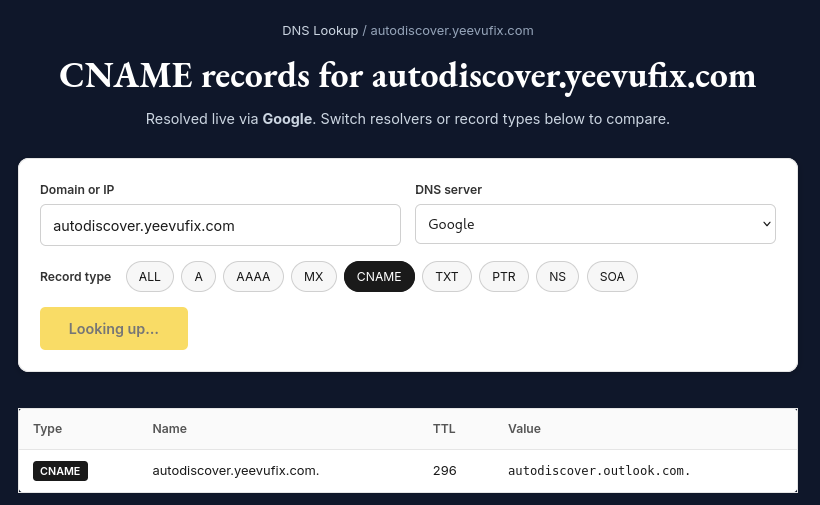
- Check it with the DNS lookup tool: autodiscover.yourbusiness.com should point to autodiscover.outlook.com, as in this autodiscover CNAME lookup.
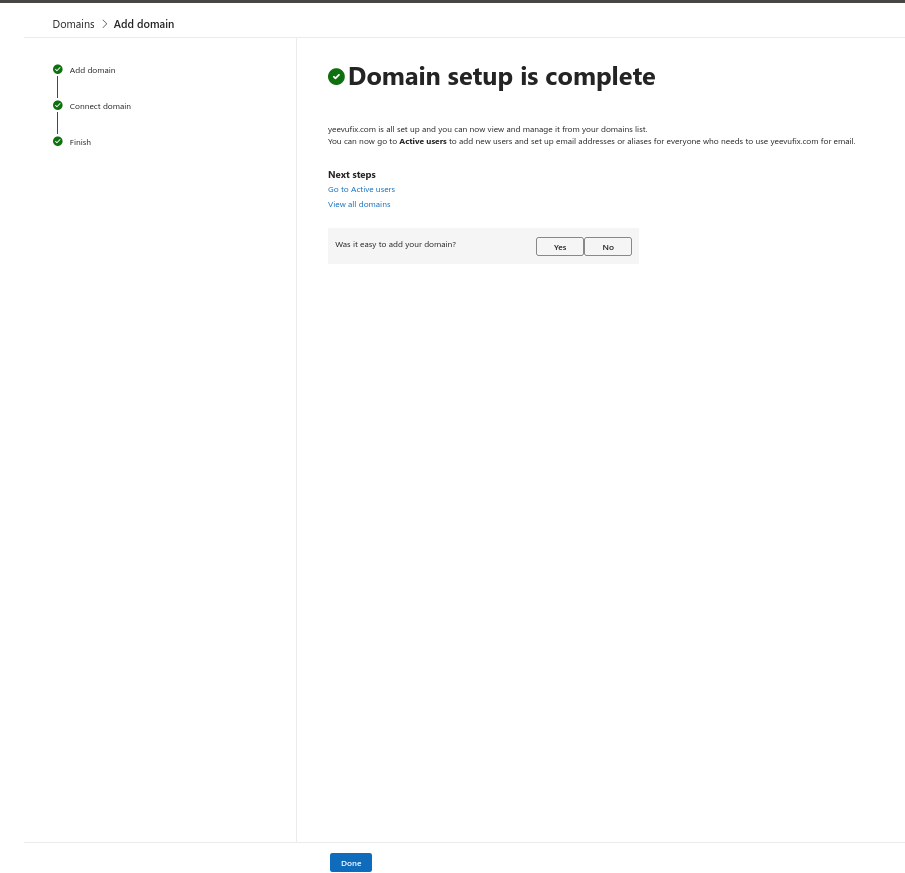
- Back in the Microsoft 365 admin center, select Continue. Microsoft checks each record, and each one should show a status of Correct. When all three pass, you’ll see Domain setup is complete.
A common mistake is pointing autodiscover at the MX value (the address ending in mail.protection.outlook.com). The target must be autodiscover.outlook.com.
Testing the Microsoft 365 Autodiscover CNAME Record Was Added

Add DMARC and DKIM for Microsoft 365 Email Authentication & Security
DKIM and DMARC are optional, but they stop other people sending email that pretends to be you and help your email reach the inbox. Gmail and Yahoo require DMARC from bulk senders.
Enable DKIM Signing for the Microsoft 365 Domain
DKIM adds a digital signature to every email you send, so receiving servers can confirm it really came from your domain and wasn’t changed on the way.
- Open the Microsoft Defender portal at security.microsoft.com and go to Email & collaboration > Policies & rules > Threat policies > Email authentication settings > DKIM.
- Select your domain. Microsoft shows two CNAME records, selector1._domainkey and selector2._domainkey.
- Add both CNAME records at your DNS provider, with any proxy setting turned off.
- Back in Defender, switch on Sign messages for this domain with DKIM signatures.
Publish a DMARC Record for Microsoft 365 Email
DMARC tells receiving servers what to do with email that fails SPF and DKIM checks, and sends you reports on who is sending as your domain.
- Add a TXT record at your DNS provider with the name _dmarc.
- Set the value to v=DMARC1; p=none; rua=mailto:dmarc@yourbusiness.com, using an address that can receive the reports.
- Start with p=none to monitor. Once the reports show your real email passing, change it to p=quarantine, then p=reject.
Create User Account on Microsoft 365
Everyone who needs an email address on your domain needs a user account in Microsoft 365.
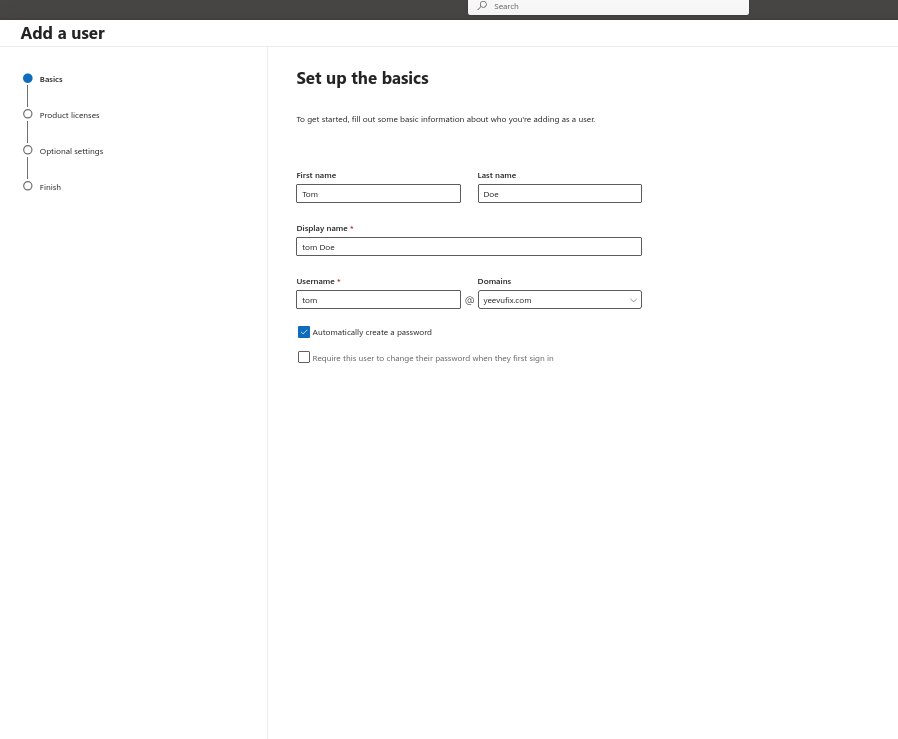
- In the admin center, go to Users > Active users and select Add a user.
- Enter the first name, last name and display name. The display name is what people see next to your emails.
- Enter the Username (the part before the @) and pick your domain from the Domains list.
- Leave Automatically create a password ticked, or untick it to set your own. If you’re creating the account for someone else, tick Require this user to change their password when they first sign in.
Assign a Microsoft 365 License and Domain Email Address
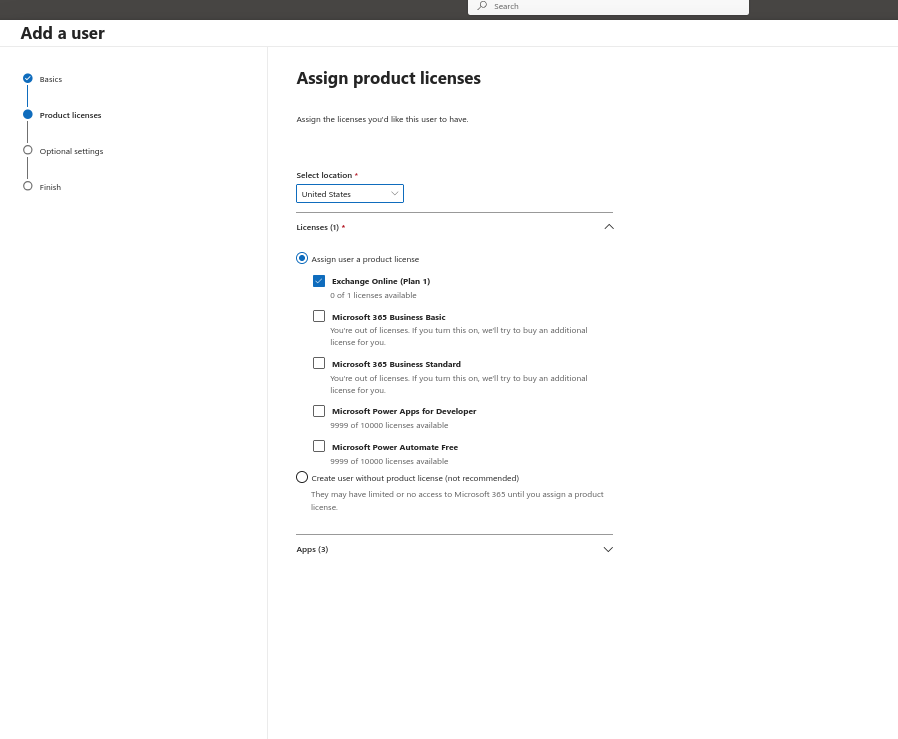
- Choose the user’s location. Microsoft uses it to decide which services the user can have, so pick the country where the person works.
- Under Licenses, select a plan that includes email, such as Exchange Online (Plan 1), Microsoft 365 Business Basic or Business Standard. If you have no spare licenses, Microsoft offers to buy one when you select it.
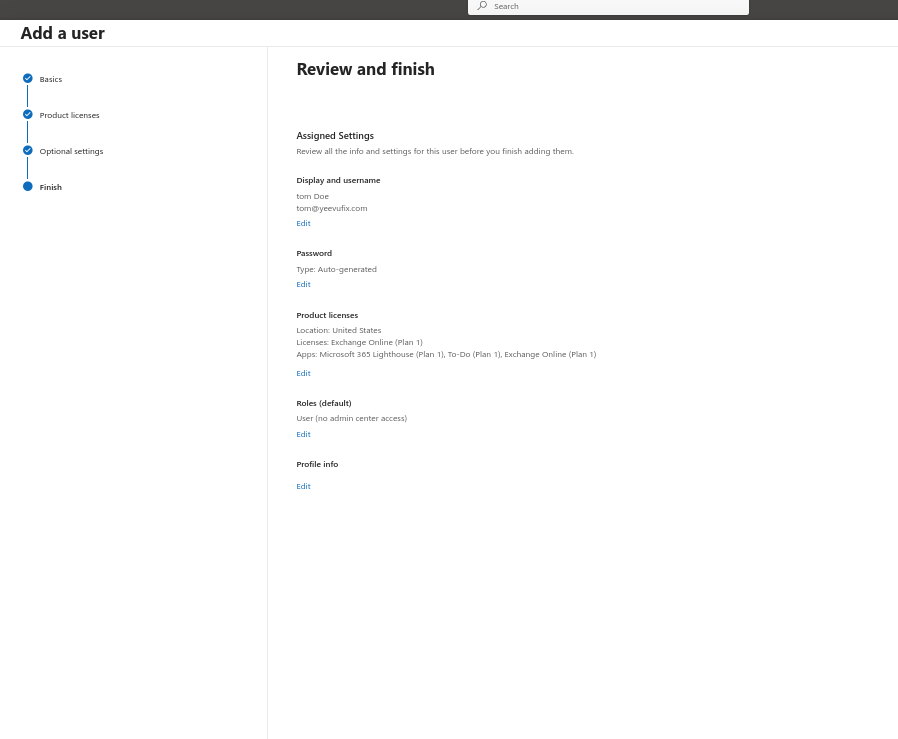
- Select Next through Optional settings. The default role is User, with no admin center access, which suits most staff.
- On Review and finish, check the name, username and license, then select Finish adding.
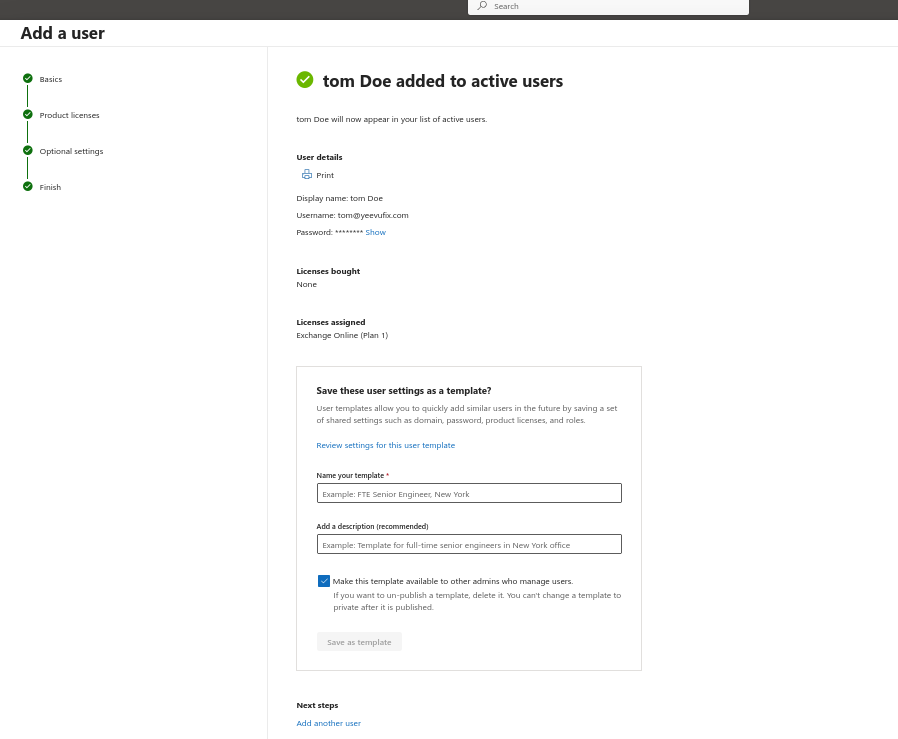
- Microsoft confirms the user was added to active users. Select Show to reveal the password and share it with the user securely. The new mailbox can take a few minutes to be ready.
Microsoft 365 Email Login
Users sign in with their full email address, such as you@yourbusiness.com, and the password from the admin center.
Microsoft 365 Email Login in Outlook on the Web
- Go to outlook.office.com.
- Enter the full email address and password.
- If prompted, set a new password and finish setting up two-factor authentication.
Add the Microsoft 365 Mailbox to Outlook and Mobile Mail Apps
- Outlook for Windows or Mac: add a new account and enter the email address. Autodiscover fills in the server settings.
- iPhone and Android: install the Microsoft Outlook app, select Add account and enter the email address and password.
Set Up 2 Factor Authentication on Microsoft 365
Two-factor authentication (2FA) asks for a code or app approval as well as the password, so a stolen password alone can’t open the mailbox. New Microsoft 365 accounts usually have security defaults switched on, which ask every user to set up 2FA at sign-in.
- Install the Microsoft Authenticator app on the user’s phone.
- Sign in at outlook.office.com. When Microsoft asks for More information required, follow the prompts and scan the QR code with the app.
- To add or change methods later, go to mysignins.microsoft.com and open Security info.
Test Incoming and Outgoing Microsoft 365 Email
Test both directions before you tell anyone the new address is live.
Test Incoming Email to the Microsoft 365 Mailbox
- Send an email from a personal account, such as Gmail, to the new address.
- It should arrive in the Microsoft 365 inbox within a minute or two. If it bounces or doesn’t arrive, check the MX record with the DNS lookup tool.
Test Outgoing Email From the Microsoft 365 Mailbox
- Send an email from the new mailbox to a personal account, such as Gmail.
- In Gmail, open the email, select the three-dot menu and choose Show original. SPF, DKIM and DMARC should all show PASS.
- If the email lands in spam or any check fails, recheck those records.
Bonus: Microsoft 365 Shared Mailboxes, Email Migration and Google Workspace
Add Microsoft 365 Shared Mailboxes and Aliases
You don’t need a paid license for every address. A shared mailbox, such as info@ or support@, needs no license up to 50 GB, and an alias adds an extra address to an existing user for free.
Create a Microsoft 365 Shared Mailbox
- In the admin center, go to Teams & groups > Shared mailboxes and select Add a shared mailbox.
- Enter a name and email address, such as info@yourbusiness.com, and save.
- Add the members who should see it. It appears in their Outlook automatically.
Add an Email Alias to a Microsoft 365 User
- Go to Users > Active users and select the user.
- Select Manage username and email, then add the alias, such as sales@yourbusiness.com.
- Select Save changes. Email to the alias arrives in that user’s inbox.
Moving Your Existing Emails to Microsoft 365
Changing the MX record only affects new email. Old emails stay with your previous provider until you move them.
- Create the Microsoft 365 mailboxes first.
- Copy the old emails across. For most providers, use the IMAP migration in the Exchange admin center (Migration > Add migration batch). For one or two mailboxes, you can export from Outlook and import the file instead.
- Switch the MX record to Microsoft 365.
- Run a final sync to catch any email that arrived during the switch.
Want it done for you? Our Microsoft 365 migration service moves mailboxes without losing email.
Adding Custom Domains to Google Workspace
Using Google Workspace instead? Google’s guide covers adding your domain as a user alias domain or secondary domain: Add a user alias domain or secondary domain.
Microsoft 365 Domain Email FAQ
How Long Does Microsoft 365 Domain Verification Take?
Usually a few minutes after you add the TXT record. DNS changes can take up to 48 hours to spread, so if verification fails, wait and try again.
Why Can’t Microsoft 365 Verify My DNS Record?
First, look the record up in the Yeevu DNS lookup tool.
- The record shows Microsoft’s exact value: your DNS is set up correctly and the hold-up is on Microsoft’s side. Microsoft’s checks can lag behind DNS changes, so wait and select Verify again later.
- The record is missing or different: fix it at your DNS provider. Common causes are a typo or extra space in the value, the full domain typed into the name field (enter
@orautodiscoveronly), a proxy setting left on, or old records that are still there.
Can a Domain Use Microsoft 365 Email and Another Email Provider?
Incoming email for a domain goes to one provider, set by the MX record. Other services, such as newsletter or helpdesk tools, can still send as your domain if you add them to your SPF record and set up their DKIM. Moving existing mailboxes across is covered in our Microsoft 365 migration service.
Why Are Microsoft 365 Emails Going to Spam?
Usually because SPF, DKIM or DMARC is missing or wrong, or because the domain is new and has no sending history yet. Check all three records first. If the problem continues, our email deliverability services can find and fix the cause.
Does Microsoft 365 Include a Free Domain Email Address?
Every account comes with a free address ending in onmicrosoft.com, such as you@yourcompany.onmicrosoft.com. To use your own domain, you need to own one, which you can register with any domain registrar.